Servlet And JavaServer Pages(JSP)
In this article, we will see about Servlet and JSP one by one.

INTRODUCTION TO SERVLET:
Servlets provide a component-based, platform-independent method for building Web-based applications, without the performance limitations of CGI programs. Servlets have access to the entire family of Java APIs, including the JDBC API to access enterprise databases.
What are Servlets?
• Java Servlets are programs that run on a Web or Application server and act as a middle layer between a request coming from a Web browser or other HTTP client and databases or applications on the HTTP server.
• Using Servlets, you can collect input from users through web page forms, present records from a database or another source, and create web pages dynamically.
- Java Servlets often serve the same purpose as programs implemented using the Common Gateway Interface (CGI).

Servlets Architecture:

METHOD OF SERVLET:
A Generic servlet contains the following five methods:
1. init()
public void init(ServletConfig config) throws ServletException
The init() method is called only once by the servlet container throughout the life of a servlet. By this init() method the servlet gets to know that it has been placed into service.
The servlet cannot be put into the service if
• The init() method does not return within a fixed time set by the webserver.
• It throws a ServletException
- Parameters — The init() method takes a ServletConfig object that contains the initialization parameters and servlet’s configuration and throws a ServletException if an exception has occurred.
2. service()
public void service(ServletRequest req, ServletResponse res) throws ServletException,IOException
Once the servlet starts getting the requests, the service() method is called by the servlet container to respond. The servlet services the client’s request with the help of two objects. These two objects javax.servlet.ServletRequest and javax.servlet.ServletResponse is passed by the servlet container.
The status code of the response always should be set for a servlet that throws or sends an error. Parameters — The service() method takes the ServletRequest object that contains the client’s request and the object ServletResponse contains the servlet’s response. The service() method throws ServletException and IOExceptions exception.
•getServletConfig()
public ServletConfig getServletConfig()
This method contains parameters for the initialization and startup of the servlet and returns a ServletConfig object. This object is then passed to the init method. When this interface is implemented then it stores the ServletConfig object in order to return it. It is done by the generic class which implements this interface.
Returns — the ServletConfig object
•getServletInfo()
public String getServletInfo()
The information about the servlet is returned by this method like version, author, etc. This method returns a string that should be in the form of plain text and not any kind of markup. Returns — a string that contains the information about the servlet
3. destroy()
public void destroy()
This method is called when we need to close the servlet. That is before removing a servlet instance from service, the servlet container calls the destroy() method. Once the servlet container calls the destroy() method, no service methods will be then called. That is after the exit of all the threads running in the servlet, the destroy() method is called. Hence, the servlet gets a chance to clean up all the resources like memory, threads, etc which are being held.
Servlet Life Cycle:
The life cycle of a servlet can be categorized into the following parts:
1. Servlet Instantiation:
Loading the servlet class and creating a new instance.
2.Servlet Initialization:
Initialize the servlet using the init() method.
3 Servlet processing:
Handling 0 or more client requests using the service() method.
4.Servlet Death:
Destroying the servlet using the destroy() method.

Web application directory structure:

Deployment Descriptor (web.xml file):
The deployment descriptor is an XML file, from which Web Container gets the information about the servlet to be invoked.
<web-app>
  <servlet>
    <servlet-name>Hello</servlet-name>
    <servlet-class>DemoServlet</servlet-class>
  </servlet>
  <servlet-mapping>
    <servlet-name>Hello</servlet-name>
    <url-pattern>/welcome</url-pattern>
  </servlet-mapping>
</web-app>
Handler Functions:
- Each HTTP Request type has a separate handler function.
- GET -> doGet(HttpServletRequest, HttpServletResponse)
- POST -> doPost(HttpServletRequest, HttpServletResponse)
- PUT -> doPut (HttpServletRequest, HttpServletResponse)
- DELETE -> doDelete (HttpServletRequest, HttpServletResponse)
- TRACE -> doTrace (HttpServletRequest, HttpServletResponse)
- OPTIONS -> doOptions (HttpServletRequest, HttpServletResponse)
A Servlet Template:
import java.io.*;
import javax.servlet.*;
import javax.servlet.http.*;
public class ServletTemplate extends HttpServlet {
  public void doGet(HttpServletRequest request,  HttpServletResponse response) throws ServletException, IOException {  // Use "request" to read incoming HTTP headers
  // (e.g. cookies) and HTML form data (e.g. data the user
  // entered and submitted).
  // Use "response" to specify the HTTP response status
  // code and headers (e.g. the content type, cookies).
     PrintWriter out = response.getWriter();
  // Use "out" to send content to browser
 }
}
Important Steps:
Import the Servlet API:
import javax.servlet.*;
import javax.servlet.http.*;
Extend the HTTPServlet class:
Full servlet API available at: http://www.java.sun.com/products/servlet/2.2/j avadoc/index.html
You need to override at least one of the request handlers!
Get an output stream to send the response back to the client
All output is channeled to the browser.
doGet and doPost:
1.The handler methods each take two parameters:
(i). HTTPServletRequest: encapsulates all information regarding the browser request.
>Form data, client hostname, HTTP request headers.
(ii).HTTPServletResponse: encapsulate all information regarding the servlet response.
>HTTP Return status, outgoing cookies, HTML response.
2.If you want the same servlet to handle both GET and POST, you can have doGet call doPost or vice versa.
Public void doGet(HttpServletRequest req, HttpServletResponse res) throws IOException {doPost(req,res);}
Hello World Servlet:
import java.io.*;
import javax.servlet.*;
import javax.servlet.http.*;
public class HelloWWW extends HttpServlet {
  public void doGet(HttpServletRequest request,     HttpServletResponse response) throws  ServletException, IOException {
    response.setContentType("text/html");
    PrintWriter out = response.getWriter();
    out.println("<HTML>\n" +"<HEAD><TITLE>Hello WWW</TITLE>    </HEAD>\n" +"<BODY>\n" +"<H1>Hello WWW</H1>\n" +"</BODY></HTML>");
  }
}
Cookies and Servlets:
• The HttpServletRequest class includes the “getCookies()” function.
> This returns an array of cookies, or null if there aren’t any.
• Cookies can then be accessed using three methods.
>String getName()
>String getValue()
>String getVersion()
Cookies & Servlets cont’d:
• Cookies can be created using HttpServletResponse.addCookie() and the constructor new Cookie(String name, String value);
> Expiration can be set using setMaxAge(int seconds)
Sessions & Servlets:
• Servlets also support simple transparent sessions
>Interface HttpSession
>Get one by using HttpServletRequest.getSession()
• You can store & retrieve values in the session
> putValue(String name, String value)
>String getValue(String name)
>String[] getNames()
Sessions & Servlets cont’d
• Various other information is stored
> long getCreationTime()
>String getId()
>long getLastAccessedTime()
• Also can set timeout before session destruction
>int getMaxInactiveInterval()
>setMaxInactiveInterval(int seconds)
INTRODUCTION TO JSP:
JavaServer Pages (JSP) is a technology based on the Java language and enables the development of dynamic websites. JSP was developed by Sun Microsystems to allow server-side development. JSP files are HTML files with special Tags containing Java source code that provide the dynamic content.
The following diagram shows a web server that supports JSP files. Notice that the webserver also is connected to a database.

JSP source code runs on the webserver in the JSP Servlet Engine. The JSP Servlet engine dynamically generates the HTML and sends the HTML output to the client’s web browser.
Why use JSP?
JSP is easy to learn and allows developers to quickly produce websites and applications in an open and standard way. JSP is based on Java, an object-oriented language. JSP offers a robust platform for web development.
Main reasons to use JSP:
- Multi-platform
- Component reuse by using Java-beans and EJB.
- Advantages of Java
You can take one JSP file and move it to another platform, web server, or JSP Servlet engine.

HTML and graphics displayed on the web browser are classed as the presentation layer. The Java code (JSP) on the server is classed as the implementation. By having a separation of presentation and implementation, web designers work only on the presentation and Java developers concentrate on implementing the application.
JSP architecture:
JSPs are essential for an HTML page with special JSP tags embedded. These JSP tags can contain Java code. The JSP file extension is .jsp rather than .htm or .html. The JSP engine parses the .jsp and creates a Java servlet source file. It then compiles the source file into a class file, this is done the first time, and this why the JSP is probably slower the first time it is accessed. Any time after this the specially compiled servlet is executed and is, therefore, returns faster.

Steps required for a JSP request:
- The user goes to a website made using JSP. The user goes to a JSP page (ending with .jsp). The web browser makes the request via the Internet.
- The JSP request gets sent to the Web server.
- The Web server recognizes that the file required is special (.jsp), therefore passes the JSP file to the JSP Servlet Engine.
- If the JSP file has been called the first time, the JSP file is parsed, otherwise, go to step 7.
- The next step is to generate a special Servlet from the JSP file. All the HTML required is converted to println statements.
- The Servlet source code is compiled into a class.
- The Servlet is instantiated, calling the init and service methods.
- HTML from the Servlet output is sent via the Internet.
- HTML results are displayed on the user’s web browser.
Creating JSP page:
<html>
  <head>
    <title>My first JSP page</title>
  </head>
  <body>
    <%@ page language=”java” %>
    <% System.out.println(“Hello World”); %>
  </body>
</html>
Using JSP tags:
There are five main tags:
- Declaration tag
- Expression tag
- Directive Tag
- Script-let tag
- Action tag
- Declaration tag ( <%! %> ):
This tag allows the developer to declare variables or methods.
Before the declaration, you must have <%!
At the end of the declaration, the developer must have %>
Code placed in this tag must end in a semicolon ( ; ).
Declarations do not generate output so are used with JSP expressions or scriptlets.
For Example,
<%!
private int counter = 0 ;
private String get Account ( int accountNo) ;
%>
2. Expression tag ( <%= … %>)
This tag allows the developer to embed any Java expression and is short for out. println().
A semicolon ( ; ) does not appear at the end of the code inside the tag. For example, to show the current date and time.
Date : <%= new java.util.Date() %>3. Directive tag ( <%@ directive … %>):
A JSP directive gives special information about the page to the JSP Engine. There are three main types of directives:
- page — processing information for this page.
- Include — files to be included.
3 . Tag library — tag library to be used on this page.
Directives do not produce any visible output when the page is requested but change the way the JSP Engine processes the page.
For example, you can make session data unavailable to a page by setting a page directive (session) to false.
- Page directive:

2. Include directive:
Allows a JSP developer to include the contents of a file inside another. Typically include files are used for navigation, tables, headers, and footers that are common to multiple pages.
Two examples of using include files:
This includes the HTML from privacy.html found in the include directory into the current JSP page.
<%@ include file = “include/privacy.html %>or to include a navigation menu (JSP file) found in the current directory.
<%@ include file = “navigation.jsp %>3. Tag Lib directive:
A tag lib is a collection of custom tags that can be used by the page.
<%@ taglib uri = “tag library URI” prefix = “tag Prefix” %>Custom tags were introduced in JSP 1.1 and allow JSP developers to hide complex server-side code from web designers.
4. Scriptlet(<%… %>):
Between <% and %> tags, any valid Java code is called a Scriptlet. This code can access any variable or bean declared.
For example, to print a variable.
<%
String username=”xyz”;
out.println(username);
%>
5. Action tag:
There are three main roles of action tags :
1) enable the use of server-side JavaBeans
2) transfer control between pages
3) browser-independent support for applets.
Javabeans
A Javabean is a special type of class that has a number of methods. The JSP page can call these methods so can leave most of the code in these Javabeans.
For example, if you wanted to make a feedback form that automatically sent out an email.
By having a JSP page with a form, when the visitor presses the submit button this sends the details to a Javabean that sends out the email. This way there would be no code in the JSP page dealing with sending emails (JavaMail API) and your Javabean could be used on another page (promoting reuse).
To use a Javabean in a JSP page using the following syntax:
<jsp : usebean id = “ …. “ scope = “application” class = “com…” />The following is a list of Javabean scopes:
page — valid until page completes.
request — bean instance lasts for the client request
session — bean lasts for the client session.
application — bean instance created and lasts until application ends.
Dynamic JSP Include:
You have seen how a file can be included into a JSP using an Include Directive:
<%@ include file = “include/privacy.html %>This is useful for including common pages that are shared and is included at compile time.
To include a page at run time you should use dynamic JSP includes.
<jsp:include page=”URL” flush=”true” />Implicit Objects:
So far we know that the developer can create Javabeans and interact with Java objects. There are several objects that are automatically available in JSP called implicit objects.
The implicit objects are:
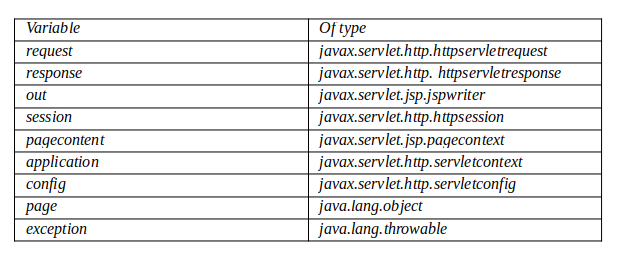
page object
Represents the JSP page and is used to call any methods defined by the servlet class.
config object
Stores the Servlet configuration data.
request object
Access to information associated with a request.
This object is normally used in looking up parameter values and cookies
<% String devStr = request.getParameter(“dev”); %>Development language = <%= devStr %>
This code snippet is storing the parameter “dev” in the string devStr.
The result is displayed underneath.
Session Tracking in JSP (Session Object):
Say, for example, you would like to implement a shopping cart using JSP. There are several options you could consider:
- Cookies — a small text file stored on the client’s machine. Cookies can be disabled in the browser settings so are not always available.
- URL rewriting — store session information in the URL. Works when cookies are not supported but can make bookmarking of web pages a problem because they have session-specific information at the end of a URL.
- Hidden form fields — HTML hidden edit boxes such as <INPUT TYPE=”HIDDEN” NAME=”USERNAME” VALUE=” … “ >. Every page has to be dynamically produced with the values in the hidden field.
- Session objects — JSP Implicit object.
- A session object uses a key/value combination to store information. To retrieve information from a session,
- session.getValue(“visitcounter”)
The return type of the method getValue is Object, so you will need to typecast to get the required value. If there is not a session key with that name, a null is returned.
To set a session key with a value,
session.putValue(“visitcounter”, totalvisits)
JSP Comments <% — JSP comment — %>:
JSP comments are similar to HTML comments <! — HTML Comment → except JSP comments are never sent to the user’s browser.
HTML comments are visible in the page source.
<html><head><title>HTML and JSP Comments</title></head><body><h2>comments</h2>
 <!-- This HTML Comment - visible in the page source --><%-- This JSP comment - not visible in the page source --%></body></html>
Compare JSP with Servlet:

Advantages of JSP over Servlets
1. JSP needs no compilation. There is the automatic deployment of a JSP, recompilation is done automatically when changes are made to JSP pages.
2. In a JSP page visual content and logic are separated, which is not possible in a servlet.
i.e. JSP separates business logic from presentation logic.
3. Servlets use println statements for printing an HTML document which is usually very difficult to use. JSP has no such tedious task to maintain.
Conclusion:
This article explains Servlet and JSP using theory and examples. And covering all basic topics very well.
Thanks.
